Yarn Posts

Pattern Obsession

I don’t know about you fellow crochet enthusiasts, but when I find a great pattern I tend to obsess over it and end up making a thousand and one things with said pattern. It’s probably one of my greatest weaknesses, but at least I appreciate well written patterns! I’m also guilty of collecting patterns with the thought “Oooh! I’ll make that for so-and-so” or “Oooh! I have been dying to try these out.” and even “Oooh! I’m sure I can use that later for something!”. Between my collection of yarn (and trust me, it’s huge. I’ll never run out of yarn for a loooong time.) and collection of patterns, I could probably make a pattern a day using a skein of yarn and not run out of either until I was 120.

With that being said, I recently bought a cabled stitch pattern for these adorable cup cozies and I picked up the pattern to actually make one yesterday…..and, I’ve made about thirty already. IMG_0104Someone help me step away from this pattern! I think it’s probably safe to assume I will be using them as stocking stuffers for work peeps, family, and friends. I thought about doing a give away on my Instagram or Facebook page, but we shall see….

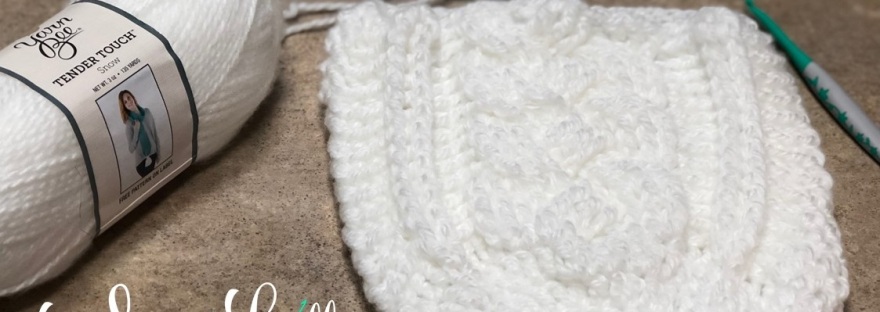
Anyway, here’s what they look like! I’ve made so many in different colors, but I’d have to say the blue sparkly is my favorite, although the white sparkly one (not pictured) is quickly topping my favorite chart.

Do you crochet and want the pattern? Check out I Dream of Yarn’s Etsy page for many more designs and patterns for sale: https://www.etsy.com/shop/IDreamOfYarnShop?ref=l2-shopheader-name

Well, that’s it for today. I’m off to make more cozies! 😛

~Yarn

Yarn Posts

Sneak Peak

As a Small Business owner, particularly a crochet small business owner, I find it quite difficult to come up with my very own patterns. Why? Because someone, somewhere has already made it and written up a pattern for it. It is quite frustrating when you are trying to get your name out there and grow your small business, but at the same time, it makes it very easy to tweak patterns to make them yours. But then, are they truly YOURS?

I would like to introduce you to my small business, Sweet Lolly Boutique, and kindly let you know, most of the items I make are orders from customers and are based on pictures they have sent me. I am blessed to be able to look at a picture and create it and hope to one day start writing my own patterns and designs. I can make just about anything and I think they are high quality items, if I don’t say so myself.

My most recent order was this beauty! They wanted a collared cocoon for their niece and I knew I could take on the task without a pattern. So I began….Slide4 (5) 
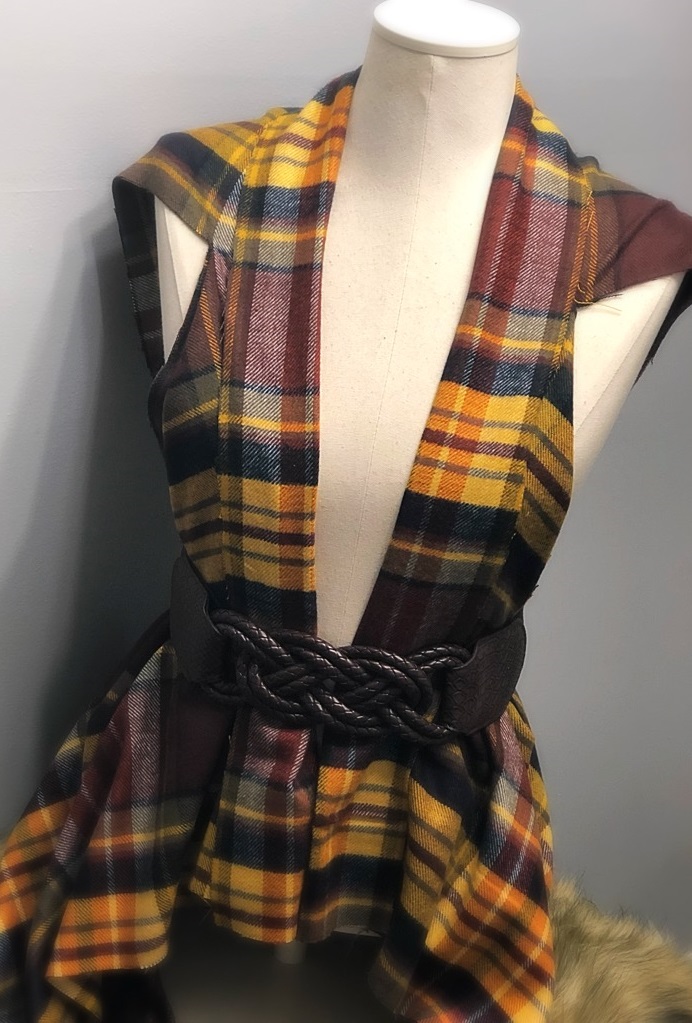
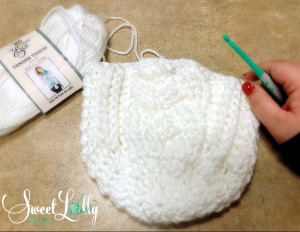
I will be writing this pattern down soon as it turned out so nice. I didn’t use any “one particular pattern” but my knowledge of several combined. The cable stitch across the front was inspired by Crochet It Creations’ cable stitch beanie (link at the bottom) but I made it only on the front of my cocoon instead of all the way around.

Next I added a collar and I believe it turned out beautifully!

So……. this pattern is coming soon and I really hope you enjoy it!

Link to the cable stitch beanie: https://crochetitcreations.com/braided-cable-beanie/

Hope you enjoy Crochet It Creations’ pattern as much as I do!

~Yarn

Yarn Posts

Plaid No-Sew Vest

As Promised, below you will find the instructions for my “AWESOME IDEA” from a post a few days ago! I’m sure there are plenty of “how to’s” for this, but this is my version. I hope you enjoy!

Plaid No-Sew Vest

IMG_9745

The picture above is the finished product and an idea of how to style it. It would be super cute with jeans, jean skirt, long sleeved dress, etc. The limits are endless and I love how easy this was.

IMG_9749

Supplies:

  1. Rotary Cutter or Scissors
  2. Measuring Tape
  3. 1 1/2 yards fabric (I prefer to buy the larger bolt, shirting material because it gives me more to work with and falls beautifully) *If you want a longer drape, buy 2 yards


Instructions:

  1. Iron the fabric. I find it so much easier to measure, fold, and cut when the fabric is ironed.
  2. Once ironed, fold the fabric over once so the selvage edge or sewn, frayed edge is on the bottom. I keep my cut edges on the top because I don’t want my vest fraying on the bottom since we aren’t hemming it.
  3. Take your measuring tape and on the top of the cut edge, measure five inches down. IMG_9748
  4. Next, measure the width between your shoulders and half it. For example: my shoulder width was 24 inches (I have very broad shoulders) so my measurement for the arm holes will be 12 inches.
  5. Measure your halved measurement (mine was 12 inches) from the FOLDED side of the fabric like shown below:IMG_9747
  6. Now, you have 5 inches from the top and 12 (or whatever your shoulder measurement is) from the fold, now it’s time to cut!
  7. Take your Rotary blade (or scissors) and make a slit down toward the selvage edge of fabric like shown: (my folded edge is to the right of my rotary cutter)IMG_9746
  8. I have found the length of my arm slit is typically the same halved measurement of my shoulder width. So for example, my arm holes are 12 inches down.
  9. Now, unfold the fabric and try it on. If it needs tweaking, then have at it.

And there you have it! A very versatile, no-sew, plaid vest. I will be crocheting a boarder around my edges because I love the way it looks, so I will be posting how to add a boarder with yarn soon. Enjoy!

~Yarn